React Router DOM v6. The Complete Guide
React Router DOM is the industry standard routing library for React. In this complete guide, we'll look at how to use React Router DOM v6 to create a professional web application. We'll start with a brief overview of React Router DOM and then look at how to use it to create a simple app. Then we'll look at some more advanced features, including creating dynamic routes and redirecting users. By the end of this guide, you'll be an expert at using React Router DOM to create React apps.
React Router DOM is a complete routing solution for React applications.
If you're looking for a complete routing solution for your React application, look no further than React Router DOM. This library provides a flexible and powerful routing system that can be used in any React application. With React Router DOM, you can declaratively define your application's routes, and the library will take care of the rest. React Router DOM is also compatible with server-side rendering, so you can use it to build isomorphic applications.
Whether you're building a single-page application or a large-scale enterprise application, React Router DOM can help you build a better user experience. So why not give it a try? You might just find that it's the perfect solution for your next project.
React Router DOM V6
React Router DOM version 6 is now available! This version includes some major changes, including a new API, new features, and some breaking changes. The biggest change in this version is the new API, which is based on React Hooks. This means that you can now use React Router DOM without a wrapper component, and you can also use it with other libraries that are based on React Hooks. Other changes in this version include a new way to define routes, and a new way to navigate between routes. There are also some breaking changes, so be sure to read the migration guide before upgrading.
What's new in React Router DOM version 6
React Router DOM version 6 has been released! This version includes some exciting new features, including:
- A new, simpler API for creating and working with routes
- Improved support for working with dynamic route parameters
- Better support for handling browser history
- A new, more flexible way to define nested routes
- And much more!
Check out the React Router DOM v6 release notes for more information on all of the new features and changes in this version.
How React Router DOM V6 works
React Router DOM version 6 works by using dynamic routing, which allows for flexibility in the way that routes are defined and matched to components. It uses a new approach called "route matching" that allows for more fine-grained control over how routes are matched to components. The new version also allows for easier configuration of routes, improved support for dynamic routes, and improved support for server-side rendering. Additionally, it uses Hooks API which makes it easier to use the library in functional components.
The React Router DOM version 6 is a complete rewrite of the previous version. The biggest change is that it now uses a declarative API. This API is easier to use and more flexible. It also allows for better performance and smaller bundle sizes.
Benefits of React Router DOM V6
React Router DOM version 6 provides several benefits over previous versions, including improved performance, smaller package size, and support for React Hooks.
In terms of performance, React Router DOM version 6 is up to twice as fast as the previous version, according to benchmarks. This is due to a number of improvements, including code minification and tree shaking.
In terms of package size, React Router DOM version 6 is significantly smaller than the previous version. This is due to the removal of legacy code and the use of modern JavaScript syntax.
Finally, React Router DOM version 6 now supports React Hooks, which allows for more flexibility and easier code reuse.
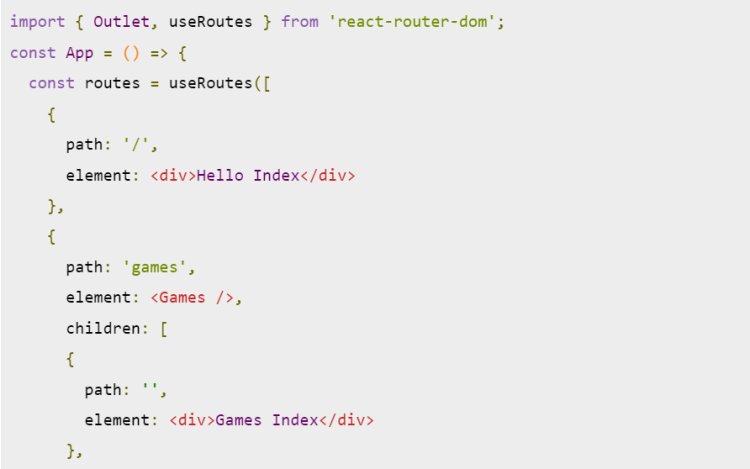
How to use React Router DOM version 6
Here's an example of how to use React Router DOM version 6 in a basic React application:
-
First, install React Router DOM using npm or yarn:
npm install react-router-domoryarn add react-router-dom -
Import the
BrowserRoutercomponent from React Router DOM:
import { BrowserRouter } from 'react-router-dom';
- Wrap your root component with the
BrowserRoutercomponent. This will provide the router context to your application:
ReactDOM.render(
<BrowserRouter>
<App />
</BrowserRouter>,
document.getElementById('root')
);
- Define your routes using the
RouteandSwitchcomponents. You can use thepathprop to define the path that the route should match, and thecomponentprop to specify which component should be rendered when the route is matched.
import { Route, Switch } from 'react-router-dom';
function App() {
return (
<Switch>
<Route path="/" exact component={Home} />
<Route path="/about" component={About} />
<Route path="/:user" component={Profile} />
</Switch>
);
}
- To navigate between routes, you can use the
Linkcomponent from React Router DOM.
import { Link } from 'react-router-dom';
function Nav() {
return (
<nav>
<ul>
<li>
<Link to="/">Home</Link>
</li>
<li>
<Link to="/about">About</Link>
</li>
</ul>
</nav>
);
}
- Lastly, you can use useParams hook to access the dynamic parts of a route.
import { useParams } from 'react-router-dom';
function Profile() {
let { user } = useParams();return <h1>Welcome {user}!</h1>;
}
Please note that this is a basic example, and there are many other features and options that React Router DOM version 6 provides. You can refer the official documentation for more details.
Tips for using React Router DOM version 6
If you're using React Router DOM for the first time, you should know that there are two ways to use it. You can either use the browser's built-in history API, or you can use React Router DOM's own history API. The latter is more powerful and provides more features, but it's also more complex.
If you're just starting out, we recommend using the browser's built-in history API. It's simpler and will be sufficient for most use cases. To use the built-in history API, you need to wrap your application in a
Once you have a history object, you can use it to create new locations. To create a new location, you can use the createHref() method. This method accepts a pathname and an optional query object. The pathname is the URL path that you want to create. The query object is used to create query parameters in the URL.
Once you have a new location, you can use the push() method to push the location onto the history stack. This will cause the browser to navigate to the new location. You can also use the replace() method to replace the current location in the history stack. This is useful if you want to update the URL without changing the location in the history stack.
You can use the go() method to navigate backwards and forwards in the history stack. This method accepts a number as an argument. If the number is positive, it will navigate forward in the history stack. If the number is negative, it will navigate backwards in the history stack.
If you want to listen for changes to the current location, you can use the listen() method. This method accepts a callback function as an argument. The callback function will be called whenever the location changes.
React Router DOM provides a number of other methods and properties that you can use. For more information, consult the React Router DOM documentation.